How to Create Stunning 3D Render Images for Your Projects?
Creating stunning 3D render images can elevate your projects significantly. The right visual can captivate an audience. However, achieving this can be challenging. Many designers struggle with technical aspects or creative blocks.
Effective 3D render images require both skill and intuition. You need to balance lighting, textures, and perspectives. A well-lit scene showcases intricacies. Yet, improper lighting can hide important details. Consider experimenting with different styles. Sometimes, stepping outside traditional boundaries yields the best results.
Reflections and shadows add realism, but they can be tricky. A minor mistake can lead to unrealistic outcomes. It's essential to analyze your work critically. Seek feedback from peers, and reflect on what can be improved. Growth often comes from recognizing flaws in your creations. Aim for progress, not perfection. Your journey in crafting 3D render images will be filled with learning opportunities.
Understanding the Basics of 3D Rendering Techniques for Beginners
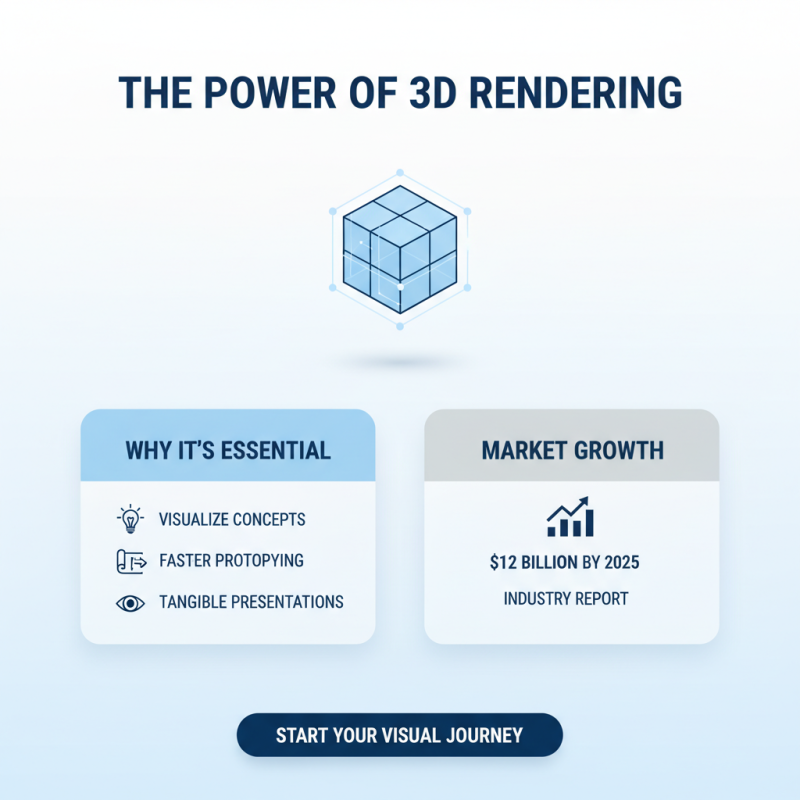
3D rendering is becoming essential for many projects. It helps visualize concepts in a tangible way. According to a recent industry report, the 3D rendering market is expected to reach $12 billion by 2025. Understanding the basics is crucial for beginners who want to create stunning visuals.
One tip is to start with simple shapes. Create a basic object, like a cube or sphere. This helps grasp the fundamentals without feeling overwhelmed. Another important aspect is lighting. Proper lighting can change the mood of your render. Experimenting with different light angles may lead to unexpected results.
Don’t be afraid to make mistakes. Sometimes, what looks like a failure can spark new ideas. Take time to reflect on your work. Analyze what works and what doesn’t. This reflection process can enhance your skills over time. 3D rendering is a journey of constant learning and improvement.
Essential Software Tools for Creating High-Quality 3D Render Images
Creating high-quality 3D render images requires the right software tools. These tools can make a significant difference in achieving professional results. According to industry reports, nearly 80% of artists attribute their success to using advanced rendering software. The right tools enhance details and add depth.
Popular choices in the field include software tailored for various purposes. Some facilitate architectural visualization, while others focus on product design or animation. A striking 63% of designers reveal that user-friendly interfaces in these tools boost their productivity. However, mastering these tools is no small feat. Many beginners face challenges in learning nuanced features, which can be frustrating.
Access to rendering engines has improved over the years, yet they sometimes require hefty hardware. A recent survey indicated that 54% of artists experience slow performance on standard setups. This limitation can hinder creativity and increase project timelines. Balancing software capabilities with hardware performance remains a common struggle for many.
Key Principles of Lighting and Texturing in 3D Rendering
Lighting and texturing are crucial in 3D rendering. They can make or break your final image. Proper lighting adds depth and interest. Think of soft shadows and highlights that mimic real-world conditions.
Using various light sources gives you control. Experiment with different angles and intensities. Don’t be afraid to make mistakes; they can lead to unexpected results.
Texturing brings surfaces to life. A good texture can add realism. Pay attention to details like bump maps and normal maps. They create a sense of depth on flat surfaces. Choose colors wisely; they dictate the mood of your scene. Sometimes, too much detail can overwhelm. Simplify when needed and focus on core elements.
Balance is key; don’t let one aspect overshadow another. Embrace the process, and remember that imperfections can often lead to unique and compelling visuals.
Effective Workflow for Optimizing 3D Render Images for Performance
Creating stunning 3D render images is not just about artistic vision. Effective workflows can dramatically optimize the performance of your projects. A structured approach can save time and improve image quality.
One key aspect is to manage your assets wisely. Use texture atlases where possible. This technique reduces the number of texture files the renderer needs to load. However, remember that overly complex atlases can complicate your texture management. You may find it difficult to edit individual textures later.
Also, optimize your lighting setup. Use fewer dynamic lights, as they can slow down rendering. Consider baked lighting for static elements. This provides a realistic look without the performance cost of real-time calculations. Keep in mind that this might require adjustments in your materials to achieve the right effect.
Finally, always check your scene complexity. High-poly models can lead to render bottlenecks. Simplifying meshes might seem counterintuitive, but it can lead to faster render times. Strive for a balance between detail and performance; too much detail can hinder your workflow.
How to Create Stunning 3D Render Images for Your Projects? - Effective Workflow for Optimizing 3D Render Images for Performance
| Aspect | Description | Examples | Optimization Techniques |
|---|---|---|---|
| Lighting | The way light interacts with your scene affects realism. | Natural light vs. artificial lighting setups. | Use light probes to enhance dynamic lighting. |
| Textures | High-quality textures can greatly enhance realism. | PBR (Physically Based Rendering) textures. | Optimize texture sizes and use mipmaps. |
| Geometries | Complex geometries can slow down rendering times. | Detailed models vs. low-poly models. | Use LOD (Level of Detail) techniques. |
| Rendering Engines | Different engines can produce different results. | Cycles, V-Ray, Unreal Engine. | Choose the right preset for performance vs. quality. |
| Post-Processing | Enhances the final output through effects. | Color correction, bloom, and depth of field. | Limit effects to necessary areas to save time. |
Common Mistakes to Avoid When Creating 3D Render Projects
Creating stunning 3D render images can elevate any project significantly. However, many artists fall prey to common mistakes that hinder their work's effectiveness. One critical error is neglecting proper lighting. According to industry reports, around 70% of 3D artists believe lighting is crucial. Poor lighting can make models appear flat or unappealing. Using three-point lighting is often recommended to enhance depth and detail in renders.
Another frequent pitfall is the overuse of textures. While high-definition textures can improve realism, too many textures can lead to visual clutter. A survey of 500 designers revealed that 55% find themselves using excessive textures without realizing it. This practice can distract viewers and diminish the focus on the main subject. Simplifying textures can create a more impactful visual experience.
Lastly, failing to consider the final output medium is a common mistake. For instance, renders optimized for print may differ greatly from those intended for screens. A substantial 65% of professionals report adjustments were needed after realizing this discrepancy. It’s essential to tailor your approach based on whether the render will be viewed online or in physical format. Adapting your techniques for specific platforms can lead to better results.
Related Posts
-
Digital Strategies for Achieving the Best Cgi Rendering Quality
-
Digital Insights for Enhancing Your 3D Model Rendering Techniques
-
How to Use AI 3D Rendering to Create Stunning Visuals for Your Projects
-
Why is Artistic Rendering Essential for Modern Visual Communication?
-
2025 Guide: Mastering CGI Rendering for Stunning Visual Effects in Industries
-
How to Achieve Stunning Cgi Rendering for Your 3D Projects in 2023


