


10 Tips for Stunning 3D Home Rendering
Creating a convincing home image takes more than polished software and dramatic lighting. 3d Home Rendering combines architectural knowledge, visual judgment, and careful communication with clients. A strong render should show how people may experience a space, not merely how attractive the furniture looks.
This guide presents ten practical tips for improving realism, clarity, and emotional impact. It covers accurate measurements, balanced composition, natural materials, daylight direction, camera height, and believable details. A walnut floor should reveal subtle grain. Window glass should reflect the garden without hiding the room. Soft shadows beneath a sofa can make the entire scene feel grounded.
Small choices matter.
Professional artists often compare renders against floor plans, material samples, and real photographs. This habit reduces visual errors and supports reliable design decisions. It also helps clients understand proportions before construction begins. However, perfection is not always the goal. An overly clean image may feel artificial, while a slightly imperfect cushion or uneven plant leaf can suggest real life.
That distinction deserves reflection. A beautiful render can still mislead viewers if scale, lighting, or materials are inaccurate. For dependable results, every creative decision should support the project’s architectural truth. These tips offer a practical foundation for producing images that look impressive, communicate clearly, and remain useful throughout the design process.
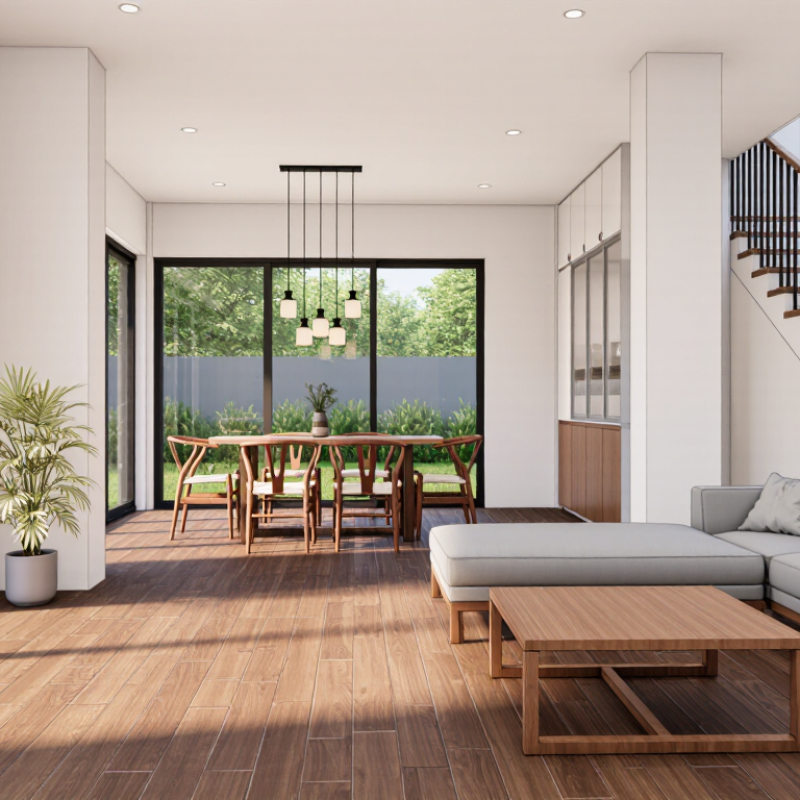
Define the Project Scope, Style, and Rendering Goals
10 Tips for Stunning 3D Home Rendering
Define the Project Scope, Style, and Rendering Goals
Tip 1: Write a clear project brief before opening the rendering software. Record room sizes, camera views, materials, and delivery dates. Tip 2: Define the audience and purpose. A family presentation needs warmth, while a technical review needs accuracy. Tip 3: Choose a visual style early. Minimalist, rustic, and contemporary interiors require different lighting and material decisions. Tip 4: Set realistic rendering goals. Decide whether the image should sell an atmosphere, explain construction, or test furniture placement.
Tip 5: Collect precise references, not random inspiration. Include floor plans, material samples, window directions, and site photographs. Tip 6: Build the essential geometry first. A correct wall thickness often matters more than decorative objects. Tip 7: Establish camera height and composition before adding detail. Viewers notice awkward perspectives immediately. Tip 8: Match lighting to the project’s real conditions. Morning light through a narrow window creates different shadows from soft evening light. Test it.
Tip 9: Use materials with measured scale and believable roughness. Glossy wood can look artificial when every surface reflects equally. Tip 10: Review the draft with another person. Fresh eyes may reveal unclear circulation or an oversized pendant. I have missed such issues myself. A polished image can still communicate the wrong design. Keep one revision focused on accuracy, and another focused on mood. Document each change, including uncertain decisions, so the final rendering remains dependable and easy to evaluate.
Build an Accurate 3D Model from Plans and Measurements
A convincing home rendering begins with dependable information. I compare every plan with on-site measurements before modeling. Small errors can distort the entire room. Record wall lengths, ceiling heights, window positions, door swings, and structural columns. Measure twice. Trust neither memory nor assumptions.
Model the shell before adding furniture or decorative materials. Set the correct wall thickness, floor levels, and ceiling openings. Mark plumbing points and electrical locations early. These details affect cabinet sizes, lighting, and circulation. Use consistent units throughout the project. A single unit mistake can make a doorway look absurdly narrow. I also photograph each corner and label the images by room. This evidence helps resolve unclear drawings later.
Materials should follow the measured design, not hide mistakes. Use realistic floor thicknesses, grout lines, and countertop edges. Test daylight at different times because shadows reveal incorrect window depths. Review the camera from a standing person’s height. An attractive angle can still misrepresent the space. I sometimes leave minor imperfections in the draft, such as uneven existing walls. That choice encourages useful discussion, though it requires judgment. Before final rendering, compare the model against the plans again. Invite a builder or experienced designer to question unclear details. Fresh eyes catch errors I stop noticing.
Shape the Scene with Materials, Lighting, and Camera Views
A convincing 3D home rendering begins with material decisions, not decoration. Study how stone catches soft highlights, how oak absorbs warm light, and how brushed metal breaks reflections. Use physically measured roughness and believable scale. A tile that looks oversized can distort the entire room. The 2024 U.S. Energy Information Administration report states that lighting represents about 15% of household electricity consumption. That makes lighting both a visual and practical design issue.
Tip 1: Build a material hierarchy. Choose one dominant surface, two supporting textures, and one restrained accent. Avoid making every wall dramatic. Real homes contain quiet areas. Slight imperfections often create more credibility than flawless repetition.
Tip 2: Layer the lighting. Start with daylight, then add ambient and task sources. Test the scene at morning, afternoon, and evening. A 2023 residential lighting study published in the Journal of Building Engineering found that color temperature strongly influences perceived comfort and spatial character. However, brighter is not always better. I sometimes over-light a room, then discover that its depth has disappeared.
Camera placement should explain the home, not merely display it. Keep the lens height near eye level for lived-in realism. Use a wider view carefully; excessive perspective can enlarge narrow rooms unnaturally. Create one establishing frame, one circulation view, and one detail frame. The 2024 National Association of Realtors buyer survey reported that 83% of purchasers considered property photography useful during their search. A rendering must therefore communicate quickly, but speed should not replace accuracy.
10 Tips for Stunning 3D Home Rendering: Lighting Color Temperatures
Typical Kelvin values help establish realistic lighting moods when shaping a residential 3D scene.
Warm sources create intimate interiors, while neutral and daylight-balanced sources reveal material color and surface detail more clearly. Combining these ranges with controlled exposure and camera views can produce a more convincing architectural render.
Add Realistic Details, Furniture, and Environmental Context
A convincing 3D home rendering begins with details people recognize from daily life. Measure wall thickness, window height, and ceiling depth carefully. Small errors can weaken an otherwise polished scene. Add believable furniture with varied sizes, fabrics, and positions. A dining chair should not float above the floor. Leave practical space around it.
Materials need more than color. Rough wood, brushed metal, and soft linen reflect light differently. Add subtle scratches, seams, fingerprints, and uneven edges where appropriate. Keep these details restrained. Too much perfection can make a room feel artificial. I often reduce texture strength after viewing the image at full size. It usually looks better.
Environmental context gives the home a sense of place. Show soft daylight entering through sheer curtains, or add warm interior light near a reading corner. Include plants, books, lamps, rugs, and a few personal objects. Their shadows should follow the main light source. Exterior elements matter too. Trees, neighboring walls, pavement, and distant buildings can establish scale. Weather should influence the atmosphere. A cloudy sky needs softer contrast, while late sunlight creates longer shadows. Test several camera heights and focal lengths. One angle may hide poor proportions. Another may expose them. Rendering is partly technical, but it also requires judgment, revision, and honest observation. Some early choices will fail. That is useful information.
10 Tips for Stunning 3D Home Rendering - Add Realistic Details, Furniture, and Environmental Context
| Tip | Design Focus | Recommended Practice | Practical Benchmark | Realism Benefit |
|---|---|---|---|---|
| 01 | Use accurate room proportions | Model walls, doors, windows, and ceiling heights from measured plans rather than visual estimates. Keep furniture scaled to the room so circulation paths remain believable. | Typical residential ceiling height: 2.4–3.0 m Recommended main walkway: 0.9–1.2 m |
Correct proportions prevent a room from appearing cramped, oversized, or physically impossible. |
| 02 | Add physically plausible lighting | Combine daylight from windows with practical fixtures such as ceiling lights, wall lights, and table lamps. Match light direction to the visible position of the sun or exterior environment. | Use a consistent light direction throughout the scene. Warm interior lighting commonly falls near 2700–3000 K. |
Layered lighting creates depth, supports realistic shadows, and clarifies how the space would be used. |
| 03 | Build materials with variation | Use physically based material properties for wood, stone, metal, glass, fabric, and painted surfaces. Add subtle color, roughness, and texture variation instead of using perfectly uniform finishes. | Keep roughness variation subtle, usually within 5–15% of the base value. Use texture scale that matches the real material. |
Small irregularities stop surfaces from looking artificial or computer-generated. |
| 04 | Model edge details | Add small bevels to cabinetry, countertops, furniture, and architectural edges. Avoid razor-sharp intersections unless the real object is intentionally machined that way. | Common visible bevel range for interior objects: 1–5 mm Use larger bevels on soft or heavily used furniture. |
Edges catch highlights and shadows, making objects read correctly at normal viewing distances. |
| 05 | Select furniture by scale and function | Choose furniture that fits the room's architectural style and leaves realistic clearances around doors, windows, radiators, and circulation zones. Mix large anchor pieces with smaller functional objects. | Dining table clearance: approximately 0.9 m behind occupied chairs. Seat height: approximately 0.43–0.48 m. |
Functional layouts make the rendering feel inhabited rather than staged without purpose. |
| 06 | Introduce soft furnishings | Add curtains, rugs, cushions, throws, bedding, and upholstery with natural folds and compression. Keep fabric thickness and drape appropriate to the material. | Allow curtains to reach the floor or stop consistently at the sill. Use slight cushion compression at contact points. |
Soft materials absorb light differently and add tactile detail, comfort, and visual scale. |
| 07 | Create believable imperfections | Vary the rotation and spacing of books, décor, plants, and kitchen items slightly. Add restrained wear, fingerprints, small scratches, or material irregularities where everyday use would create them. | Keep object rotation changes subtle, generally within 1–5°. Use imperfections selectively rather than across every surface. |
Controlled imperfection removes the sterile appearance of perfectly aligned computer models. |
| 08 | Frame the exterior context | Show a coherent view beyond the windows, including nearby buildings, vegetation, terrain, sky conditions, or neighboring structures appropriate to the setting. | Keep exterior brightness balanced with the interior exposure. Place distant elements at visually consistent scale and perspective. |
Environmental context explains the source of daylight and gives the home a convincing sense of place. |
| 09 | Use natural camera composition | Set the camera near human eye level and use verticals carefully. Choose a field of view that shows enough of the room without creating excessive wide-angle distortion. | Interior camera height: approximately 1.5–1.7 m Moderate interior field of view: approximately 60–90°. |
Natural perspective makes the viewer feel present in the space and preserves architectural credibility. |
| 10 | Finish with balanced post-production | Adjust exposure, white balance, contrast, color grading, and sharpness consistently across the image. Preserve shadow detail and avoid excessive bloom, saturation, or artificial depth effects. | Maintain visible detail in both highlights and shadows. Review the final image at its intended display size before exporting. |
Subtle post-production improves clarity while allowing the modeled details and materials to remain believable. |
Review, Refine, and Export High-Quality Home Renderings
A convincing 3D home rendering begins with a disciplined review, not a quick export. I inspect the camera height, wall alignment, material scale, and daylight direction. A window frame that is two centimeters too thick can make a room feel smaller. I compare the image with the floor plan and the intended mood. Details matter. I also check whether furniture blocks circulation. Sometimes my first composition looks attractive but feels impractical. That weakness deserves correction, not concealment.
Refining works best in controlled passes. I adjust exposure before color, then correct reflections, shadows, and edge sharpness. Real materials need variation: timber should not repeat like wallpaper, and stone should carry subtle tonal shifts. I reduce glossy highlights on painted walls because they often suggest plastic. Test renders at a smaller resolution reveal distracting noise and uneven lighting. They are not final images. Still, they expose problems quickly. A second opinion from an architect or client can identify a proportion that I have overlooked.
Before export, I confirm the output dimensions, color profile, file format, and naming structure. I keep one lossless master file and create smaller versions for presentations. Fine textures may disappear after compression, while excessive sharpness can create bright halos around furniture. I inspect the rendered image at full size and at thumbnail size. Both views matter. I leave a little time for a final pause. Occasionally, the technically perfect version is less convincing than an earlier draft with softer light. Quality depends on judgment as much as settings.
Related Posts
-
Why Choose 3D Home Rendering for Your Next Project?
-

Top Strategies for Achieving the Best Render Quality in Sketchup
-
How to Elevate Your Projects with High-Quality Architectural Rendering Techniques
-
How to Enhance Your Project with Architectural Rendering Techniques
-
How to Render Sketchup Models Effectively?
-

Top 10 Benefits of Architectural Rendering for Your Projects?